Saltbox storage barns offer a classic design with a distinctive roof, providing ample storage space while blending seamlessly into any backyard setting. Their traditional appeal and ease of construction make them a popular choice for DIY enthusiasts, with PDF blueprints readily available for various sizes and customization options.
1.1 What is a Saltbox Shed?
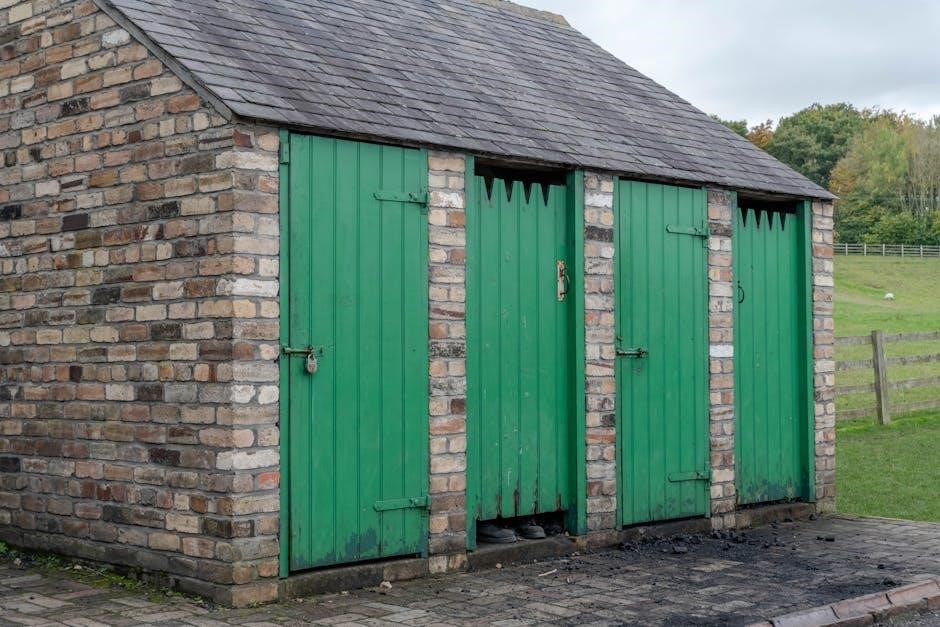
A saltbox shed is a traditional storage structure characterized by its distinctive asymmetrical roof, with a longer slope on the rear side. This design provides ample space, durability, and a classic aesthetic, making it ideal for storing tools, equipment, and seasonal items. Available in various sizes, saltbox sheds are popular for their practicality and ease of construction, with detailed PDF blueprints offering a straightforward guide for DIY projects.
1.2 Benefits of Saltbox Storage Barns
Saltbox storage barns offer a blend of functionality and timeless charm. Their asymmetrical roof design maximizes interior space while providing excellent weather protection. Durable, versatile, and aesthetically pleasing, these barns enhance backyard settings. Available in various sizes, they cater to diverse storage needs, making them a practical and cost-effective solution for organizing tools, equipment, and more, with designs suitable for both small and large properties.
1.3 Popularity of Saltbox Sheds in Modern Storage Solutions
Saltbox sheds have gained popularity due to their timeless design and functional appeal. Their classic roof style complements modern backyard settings, offering versatile storage solutions. With a wide range of sizes and customizable options, these sheds cater to diverse needs, from small gardens to large properties. Easy-to-follow PDF blueprints further enhance their appeal, making them a preferred choice for DIY enthusiasts and homeowners seeking practical yet stylish storage solutions.
Key Features of Saltbox Storage Barn Blueprints
Saltbox storage barn blueprints feature a classic design with a distinctive roof, offering ample storage space. Detailed plans include a materials list, step-by-step instructions, and customizable sizes for easy construction.
2.1 Design Elements of Saltbox Sheds
Saltbox sheds are known for their distinctive roof with a long rear slope. They often feature double doors for easy access, optional windows for light, and a 4×4 wood frame floor system. Structurally, they use pressure-treated lumber and a concrete foundation for durability. These elements provide both functionality and aesthetic appeal, making them a practical choice for storage needs.
2.2 Size Options for Saltbox Storage Barns
Saltbox storage barns are available in various sizes, from compact 8×12 feet to larger 16×12 feet designs. Popular options include 10×8, 12×10, and 10×12 feet, offering versatile storage solutions. These sizes accommodate different needs, from small gardens to extensive storage requirements. The plans often include materials lists and construction guides, ensuring durability and functionality for any backyard or workspace.
2.3 Customization Options in Saltbox Shed Plans
Saltbox shed plans often include customization options, such as adding shelves, windows, or double doors for easy access. Homeowners can choose from various roof styles, exterior finishes, and interior layouts to suit their needs. Some plans also offer electrical and lighting options, allowing for personalized workspace or storage solutions. These features make saltbox sheds versatile for both functional and aesthetic purposes.
How to Choose the Right Saltbox Shed Blueprint
Selecting the right saltbox shed blueprint involves considering your space, budget, and storage needs. Look for plans that offer customizable options and clear instructions, ensuring a seamless building process tailored to your preferences and property requirements.
3.1 Assessing Your Storage Needs
Evaluate the items you plan to store, such as tools, equipment, or seasonal decorations, to determine the ideal shed size. Consider future needs to avoid outgrowing the space. Measure your yard to ensure the shed fits comfortably. Assessing your storage needs helps you choose a blueprint that balances functionality, space efficiency, and aesthetic appeal, ensuring your saltbox shed meets all your requirements effectively.
3.2 Importance of PDF Format for Blueprints
PDF format is essential for blueprints as it ensures universal accessibility and consistency across devices. Scalable for different printers, PDFs maintain crisp details, making them ideal for construction plans. They often include cut lists, shopping lists, and detailed drawings, streamlining the building process. PDFs are also easy to share with contractors or local print shops, ensuring everyone has the same clear, precise information for your saltbox shed project.
3.3 Factors to Consider in Shed Plans
When selecting saltbox shed plans, consider your storage needs, property size, and local building codes. Ensure the design fits your yard and complies with regulations. Check the foundation requirements and door/window placements for functionality. Verify the materials list aligns with your budget and durability goals. Customization options like shelves or electrical installations should also be evaluated to meet your specific needs effectively.
Materials and Tools Required
Building a saltbox shed requires pressure-treated lumber, roofing materials, siding, and hardware. Essential tools include a saw, drill, hammer, and measuring tape. Ensure all materials are durable and weather-resistant for longevity.
4.1 List of Lumber and Hardware Needed
Constructing a saltbox shed requires pressure-treated lumber for the frame and foundation, roofing materials like plywood and asphalt shingles, exterior-grade plywood for walls and floors, and siding options such as vinyl or wood. Hardware includes hinges, latches, and nails. Ensure all materials are durable and weather-resistant to withstand outdoor conditions and provide long-lasting structural integrity.
4.2 Essential Tools for Construction
Building a saltbox shed requires tools like a circular saw for cutting lumber, a drill for drilling screw holes, and an impact driver for securing screws. A tape measure ensures accurate cuts, while a hammer and level help with framing and alignment. Additional tools include wrenches, screwdrivers, and safety glasses. These tools enable efficient and precise construction, ensuring a sturdy and well-built shed.
4.3 Recommended Materials for Durability
For a durable saltbox shed, use pressure-treated lumber for the foundation to resist rot and pests. Exterior-grade plywood or OSB is ideal for walls and flooring. Weatherproof roofing materials like asphalt shingles protect against moisture. Consider galvanized hardware for rust resistance and UV-resistant trim for exterior finishes. These materials ensure long-lasting performance and protection against the elements, while allowing for customization to suit your needs.

Step-by-Step Construction Guide
Build your saltbox shed by following detailed blueprints, starting with site preparation, framing, and roof installation. Add doors, windows, and finish with siding for a complete project.
5.1 Preparing the Site and Foundation
Begin by selecting a flat, dry area for your saltbox shed. Clear debris and level the ground to ensure a stable base. Mark the shed’s dimensions using stakes and string. For the foundation, opt for a concrete slab or a gravel base, ensuring proper drainage. Use a level to check evenness and align the site with local building codes. This step is crucial for a durable and long-lasting shed structure.
5.2 Framing the Shed
Start by constructing the floor frame using pressure-treated lumber for durability. Assemble the wall frames on the foundation, ensuring they are square and level. Use galvanized fasteners to secure the walls to the floor. Install roof rafters and beams to support the saltbox roof design. Double-check all measurements and alignments to ensure structural integrity before proceeding to the next steps. Proper framing is essential for a sturdy and durable shed.
5.3 Installing the Roof and Siding
Begin by attaching the roof rafters to the framing, ensuring proper alignment for the saltbox roof design; Cover the rafters with roofing felt and shingles for weather protection. Install siding panels or boards to the walls, starting from the bottom and working upward. Use galvanized fasteners to secure the siding and ensure a watertight seal. Follow the blueprint for precise measurements and a professional finish.
5.4 Adding Doors and Windows
Install pre-hung doors to ensure proper alignment and functionality. Secure the doors with heavy-duty hinges and a sturdy locking system. For windows, choose sizes that match your blueprint and fit the saltbox aesthetic. Ensure proper sealing around doors and windows to prevent leaks. Follow the blueprint for precise measurements and alignment. Double-check that all openings are level and securely fastened to maintain structural integrity and weather-tightness.
Tips for Customizing Your Saltbox Shed
Enhance functionality by adding shelves, workbenches, or electrical installations. Personalize the exterior with paint, trim, or decorative accents to match your home’s style and improve curb appeal.
6.1 Adding Shelves and Storage Solutions
Maximize space by installing shelves, hooks, and workbenches tailored to your needs. Use PDF blueprints to design custom layouts, ensuring efficient organization. Add adjustable shelving for flexibility, and incorporate bins or baskets for smaller items. Consider built-in cabinets or pegboards to enhance functionality. Proper placement near work areas or entry points can streamline daily use, making your saltbox shed a highly functional storage and workspace solution.
6.2 Incorporating Electrical and Lighting Options
Enhance functionality by adding electrical systems and lighting to your saltbox shed. Install LED lights for energy efficiency or task lighting near work areas. Consider GFCI outlets for safety and USB ports for modern convenience. Use PDF blueprints to plan wiring layouts and ensure compliance with local codes. Consult a licensed electrician for complex installations to guarantee safety and reliability in your storage barn.
6.3 Enhancing the Exterior with Paint and Trim
Elevate your saltbox shed’s curb appeal by adding a fresh coat of weather-resistant paint and decorative trim. Choose colors that complement your home or backyard theme for a cohesive look. Use high-quality exterior paint to protect the wood and ensure longevity. Add trim around doors, windows, and roof edges for a polished finish. PDF blueprints often include tips for selecting the perfect paint and trim combinations to enhance your shed’s classic design.

Legal and Safety Considerations
Ensure your saltbox shed complies with local building codes and obtain necessary permits. Follow safety guidelines during construction, such as using protective gear and ensuring structural integrity.
7.1 Obtaining Necessary Permits
Before constructing your saltbox storage barn, check with local authorities to determine if permits are required. Ensure your shed design complies with zoning laws and building codes. Submit detailed blueprints for approval, and verify if inspections are needed during construction. Failure to obtain proper permits may result in fines or project delays, so plan accordingly to avoid compliance issues.
7;2 Ensuring Compliance with Local Building Codes
Ensure your saltbox storage barn complies with local building codes by reviewing zoning laws and structural requirements. Verify setbacks, height restrictions, and material standards. Use PDF blueprints to demonstrate compliance during permit reviews. Non-compliance may result in fines or teardowns, so consult local authorities early in the planning process to avoid issues. DIY builders should consider professional guidance if unsure about code adherence.
7.3 Safety Tips for DIY Construction
Ensure safety during DIY construction by wearing protective gear like gloves and safety glasses. Use power tools responsibly and follow manufacturer guidelines. Keep children and pets away from the construction site. Regularly inspect tools and materials for damage. Maintain a clean workspace to prevent tripping hazards. Follow the blueprints carefully and consult professionals if unsure about critical steps to avoid accidents and ensure structural integrity.
Cost Estimation and Budgeting
Estimate material and labor costs accurately using PDF blueprints and detailed shopping lists. Plan for tools and supplies, and consider DIY savings versus professional labor costs to stay within budget.
8.1 Estimating Material Costs
Accurately estimate material costs by reviewing PDF blueprints for detailed lumber and hardware lists. Consider the size and quality of materials, such as pressure-treated wood for durability. Factor in tools and supplies, and compare prices from local suppliers to ensure cost-effectiveness. Budget extra for potential upgrades or custom features to avoid overspending during construction.
8.2 Labor Costs for DIY vs. Professional Construction
DIY construction eliminates labor costs, saving up to 50% compared to hiring professionals. However, it requires time and skill. Professional builders offer expertise and speed but increase expenses significantly. Assess your budget, time availability, and construction skills to decide the most cost-effective option for your saltbox storage barn project.
8.3 Tips for Staying Within Budget
To stay within budget, compare material costs, opt for cost-effective lumber, and consider DIY construction. Plan carefully to avoid design changes. Use free or low-cost PDF blueprints and shop during sales. Allocate funds wisely, prioritizing essential features over upgrades. Regularly track expenses to ensure your saltbox storage barn project remains affordable and aligns with your financial goals.
Saltbox storage barns offer versatility, durability, and timeless aesthetics, making them a practical choice for storage needs. With PDF blueprints, you can easily bring your project to life and enjoy the benefits of a well-designed shed for years to come.
9.1 Final Thoughts on Saltbox Storage Barns
Saltbox storage barns combine timeless design with practical functionality, offering a versatile solution for storage needs. With customizable PDF blueprints available, homeowners can easily construct a shed that fits their space and style. The classic saltbox style ensures durability and aesthetic appeal, making it a cost-effective and enduring choice for backyard storage solutions.
9.2 Encouragement to Start Your Project
With comprehensive PDF blueprints and step-by-step guides readily available, starting your saltbox storage barn project has never been easier. Embrace the opportunity to create a functional and attractive space that enhances your property. Gather your tools, materials, and enthusiasm—your new storage barn awaits!